Posts for: #videomachine

Video Machine Sound System

I had a conversation with someone earlier about configuring digital audio output in context of a stream. The question was: what kind of output levels should you aim for when outputting music to VRChat? I decided to put together my specific version of this answer that I decided for The Magic Video Machine.

The primary motivation for the Video Machine sound system is to be able to playback mixed-origins content (analog from VHS tapes, digital movies or intermission song playback) at normalized levels - so the viewers ideally never have to touch the volume controls during the actual show.

General Design

The principal design of the sound system is shown on the image below. You may have to open it in a new tab to see it in full resolution - I have not configured vector graphics on my blog yet.
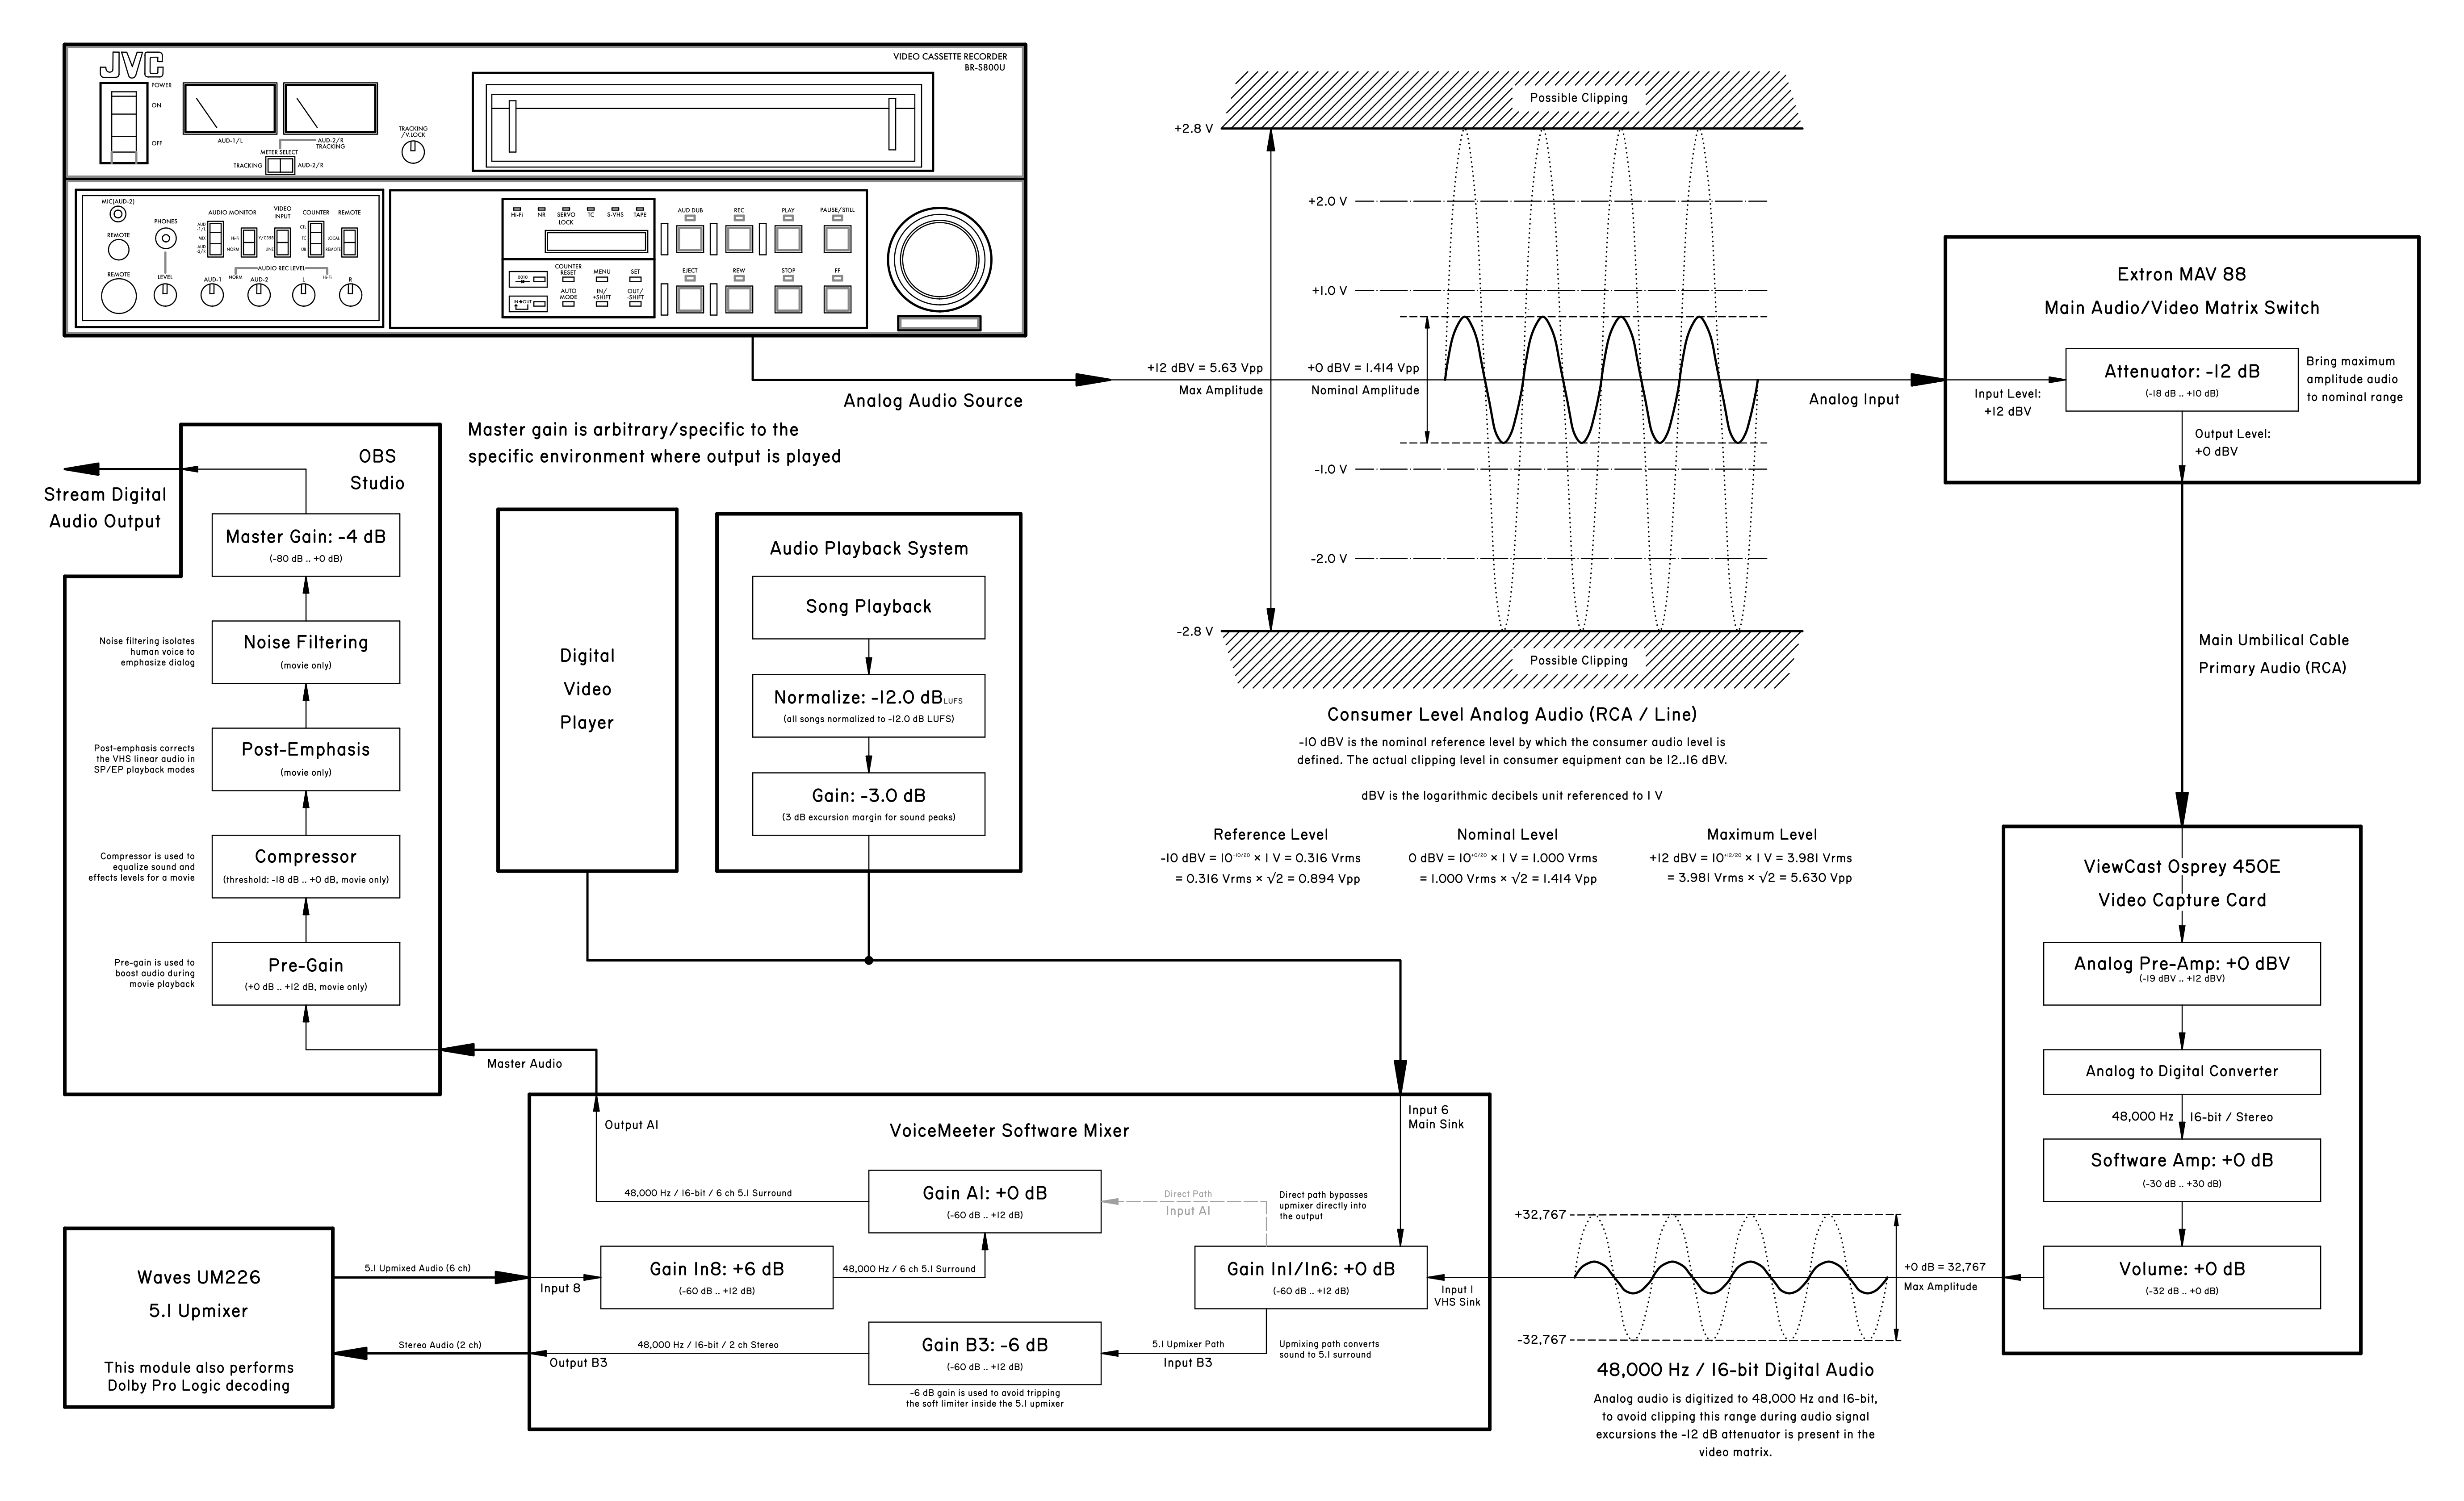
Analog audio travels through the video system at line voltage - unbalanced audio throughout the rack since none of my VCR’s support balanced audio output. Similarly, a line audio input is available on the front panel of the rack.

Because analog audio permits excursion beyond the +0 dBV level (up to +12-16 dBV across the equipment I have, for example) in order to avoid clipping the audio during analog to digital conversion a -12 dB attenuation is added - it brings maximum possible analog signal amplitude back into +0 dBV range.

This assures that even loud audio will be correctly digitized - the analog to digital converter in the capture card accepts signals around +0 dBV and outputs them close to +0 dB as digital data (a simplification). The chance of clipping is largely minimized (in practical terms anyway).

In practice I have observed outputs as high as +6 dBV from the JVC BR-S800U, as well as output up to about +9-10 dBV from the Panasonic AG-W1 (it runs slightly hotter and might have some funny malfunctions). So this is not theoretical - there really is sound data above the nominal level that needs to be digitized properly.

In the context of this post, “dBV” will refer to RMS of the sine wave - non-sine sound signal can have peak excursions beyond the spec, but I use a sine wave for actually diagnosing problems and such with the system. Based on real observed voltages on the VCR’s, there is plenty of margin that I think this simplification is okay.

LUFS Audio Normalization

Now returning to the question asked at the beginning - how to output music to VRChat and what kind of digital processing does it require? My goal has been to normalize perceptual loudness of the music so all of it plays consistently - and I have used LUFS (“Loudness Units relative to Full Scale”).

LUFS is basically an estimate of the perceived loudness of the sound content. It’s derived by calculating the sound spectrum and combining it with the known (idealistic) response curve of the human ear. The result is that LUFS is a measure of perceived sound energy - it accounts for different sensory perception of different frequencies.

Video Machine uses a target of -15.0 dB LUFS (originally conceptualized as a -12.0 dB LUFS target with additional 3.0 dB of overshoot margin). This means that for example if a song measures -9.0 dB LUFS during analysis, the final gain applied to it before playing on the output will be:

$$FinalGain = Target_{LUFS} - SongMeasured_{LUFS} =$$ $$= -15.0 \space dB - (-9.0 \space dB) = -6.0 \space dB$$

Why the extra margin? Because the exact relationship between LUFS (perceptual loudness) and the actual peaks in the audio data is not linear or trivial - it is highly dependent on the music genre (which instruments are used and how), on the way it was mixed, on any compression or clipping in the source song data. In particular, low-frequency drums tend to contribute less to perceptual loudness while having fairly high peaks in the sound data.

The primary constraint of the output is that once sound peaks in digital audio exceed +0 dB, they begin clipping. There is simply no bit width left to represent sound samples at that amplitude. So, the total gain applied to the sound data should preferably not cause any clipping.

I’ve heard a suggestion of using -10.0 dB as a LUFS target, however that is exceedingly narrow. Let me show you some of the real music that can play at the video machine.

A particular detail is that all of these songs contain peaks of +0 dB, they use the full numerical range of the 16-bit sound data. The choice of -15.0 dB LUFS is a particular reflection of the wide variety of music genres that play during the Video Machine shows.

First, an example of of pop music, characteristic with a fairly high degree of compression. Measured LUFS is -9.0 dB, resulting in -6.0 dB total gain - no clipping happens whatsoever with a hefty margin: (if LUFS target was -10.0 dB, the resulting gain would be -1.0 dB - no clipping)

So far so good. But now an example of a hip-hop beat, with presence of some low drums. Measured LUFS is -12.5 dB, resulting in -2.5 dB total gain - no clipping happens with a decent margin: (if LUFS target was -10.0 dB, the resulting gain would be +2.5 dB and considerable clipping would occur!)

Now an EDM track. Measured LUFS is -13.1 dB (heavy use of low drums!), resulting in -1.9 dB total gain - no clipping, but the margin is shrinking: (if LUFS target was -10.0 dB, the resulting gain would be +3.1 dB and we would start eating away at the drums)

A meme song with very pronounced beats… Measured LUFS is -14.7 dB, which gives a -0.3 dB gain with almost no margin:

And finally another hip-hop type track. This one is exactly the edge case which made me add that extra 3 dB on top of the 12 dB margin I selected at first. Measured LUFS is -18.7 dB (!!), which results in +3.7 dB gain and clips the tops of the drums!

It’s not a considerable issue, but most of these drum hits end up clipping or hitting a limiter. This is one of the very very few tracks in my library that actually experiences this, thankfully the duration of these segments is fairly low: (and with a -10.0 dB target, the drums become genuinely distorted with +8.7 dB gain despite the song overall not sounding all that loud).

The partly-implemented way to handle this song that I chose is to simply soft-limit the peaks, resulting in little perceptual distortion. Most songs in my library end up with peaks reaching -3.0 dB, some getting up to -1.5 dB and very very few having short moments above those.

Note that all these songs would be playing at the same perceptual loudness - they would sound about equally. However depending on the choice of the normalization target, some of their data may get clipped.

Of course, you could just compress the excess excursions… but classic rock, hip-hop music and other kinds of music with pronounced drums would suffer. As a point of interest, Apple Music normalizes loudness of the songs to -16.0 dB LUFS, while Spotify uses -14.0 dB LUFS target (-11.0 dB in the “loud” mode).

Hopefully the choice makes sense - while most music fits in the narrow range, there exists a decent amount of songs with excursions in the waveform amplitude (mostly drums) that are unusually high.

So the final answer is… you need to normalize the sound output to at least something like -12.0 .. -15.0 dB LUFS - this allows you to represent a wide variety of music without significant distortion. By default, OBS only shows RMS of the sound signal which can be used as a general guidance (see below), however I would also recommend using something like this plugin (obs-loudness-dock).

First of all, make sure that true peak is displayed, otherwise the VU meters are slightly more unpredictable with relation to the sound data:

Here is an example of a song with nice drums somewhat similar to the waveform examples shown above:
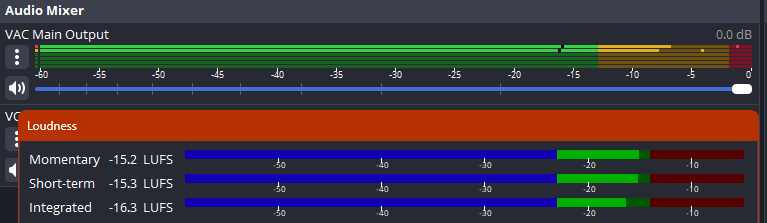
The actual VU meter jumps around a fair bit, however take note of the position of RMS dashes (black dashes on OBS VU meter), as well as position of peak indicators (glowing rectangles on the VU meters which move when new peaks are recorded).

For my chosen -15.0 dB LUFS target, the rule of thumb is the following (remember, it’s all listed relative to the True Peak measurement mode):

  1. The peaks should tickle at the start of the red area (-3.0 dB and higher) - they should generally reach the -3.0 dB level, possibly slightly above it - with excursions beyond -1.5 dB being on the uncommon side.
  2. The peaks generally move around around -6.0 dB level, specifically wiggle between -9.0 dB and -3.0 dB (purely an eyeballing heuristic). They are confidently in the middle/upper middle of the yellow area (-15 dB to -3 dB) during the main sections of the song
  3. RMS meters should usually sit somewhere between -20.0 dB and -15.0 dB

This is just a heuristic and not a strict rule - there is a reason that LUFS exists, since true loudness normalization cannot be done purely by the usual VU meters. Of course, if you have a LUFS loudness meter, then you just aim your short-term readout towards -15.0 dB LUFS (or whichever other target you pick, -12.0 dB is also a reasonable target for vast majority of the music in my sampling).

Songs will have loud segments and they will have quiet segments. The best normalization would have to be done by pre-analyzing the songs probably… but the loudness meter is a nice way to double check it.

This specific approach to loudness has been serving me pretty well - both for a large variety of different music and for playing movies which contain a mixture of background noise, dialog and very loud foreground effects. The 3.0 dB margin comes into play here as well - the compressor and pre-gain are configured so human dialog generally ends up comparable to music in loudness, with some of the louder effects sitting in that upper 3.0 dB margin - being notably loud, but not ear piercingly so.

And as an additional note - the final step of the video machine sound output is applying a -4.0 dB gain offset. All sound processing in OBS is done in floating point, so this is a way to match the loudness to what fits comfortably the music player in the VR world as well as gather a little bit of extra loudness margin for free. This -4.0 dB offset is arbitrary and isn’t part of the design of the sound system - it’s the free variable for adjusting sound on the fly. A couple dB up, a couple dB down can make a lot of difference - LUFS isn’t perfect and everyone’s ears are different.
First Time My Video Heads Clogged

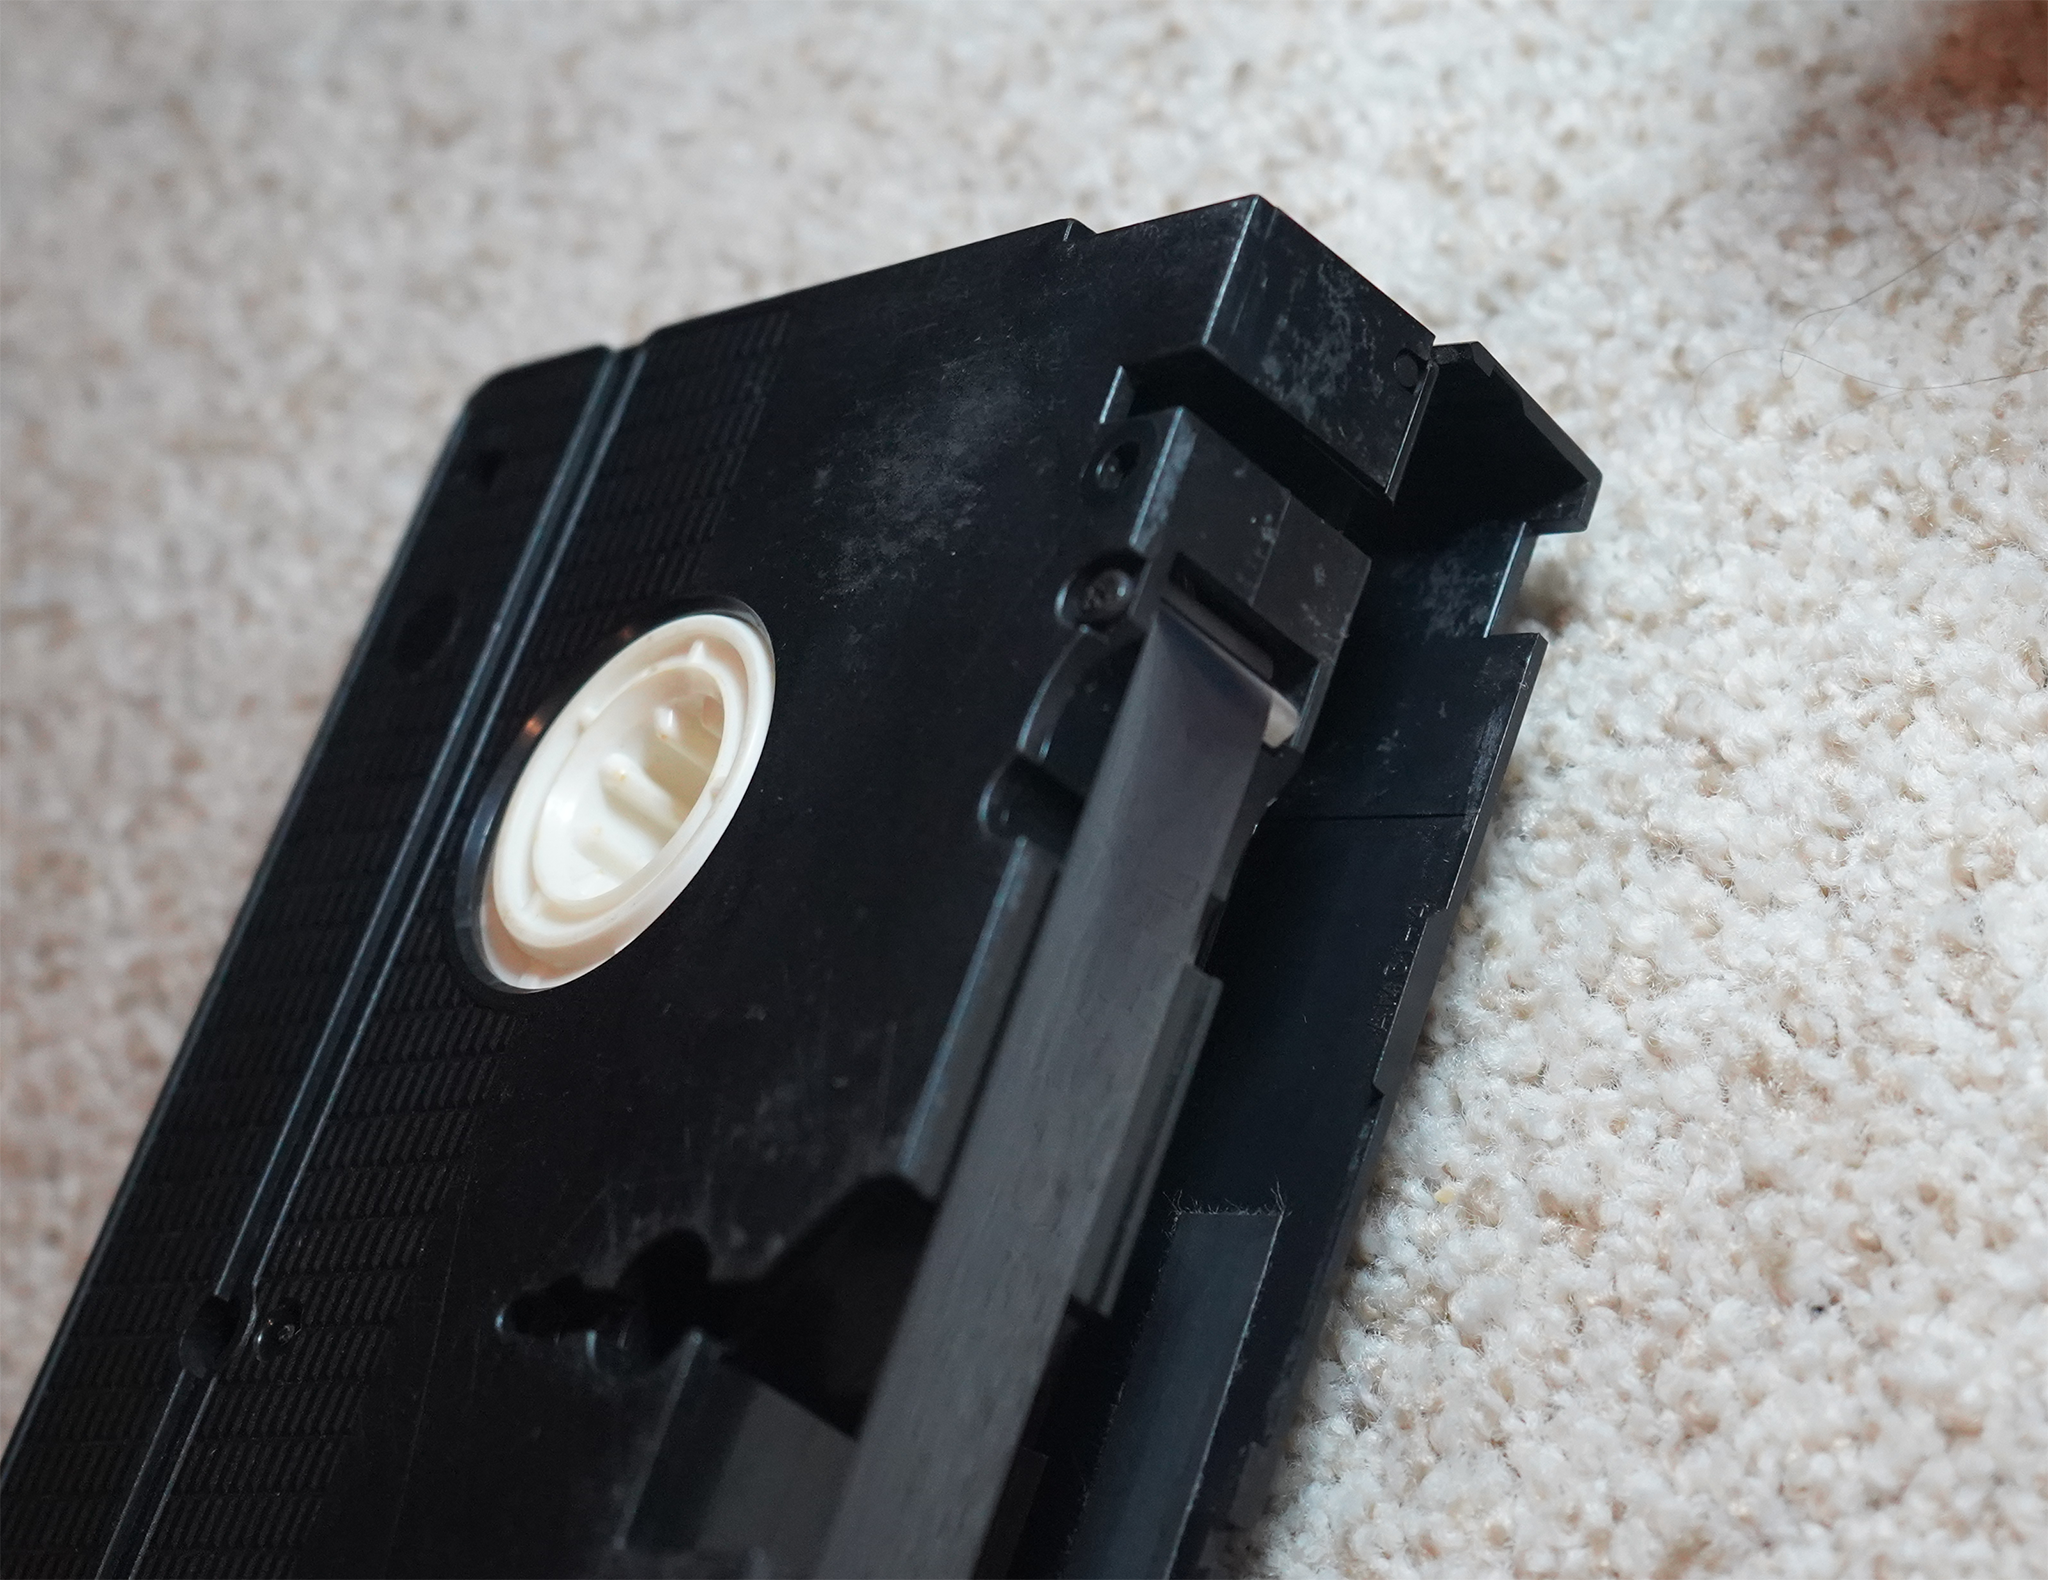
So I got this very filthy tape as an arrival - completely covered in dust, worse yet the box has a hole which means a lot of that dust ended up inside (spoiler: it was more than just dust). I decided to omit a photo of the tape box because it makes me disgusted to look at.

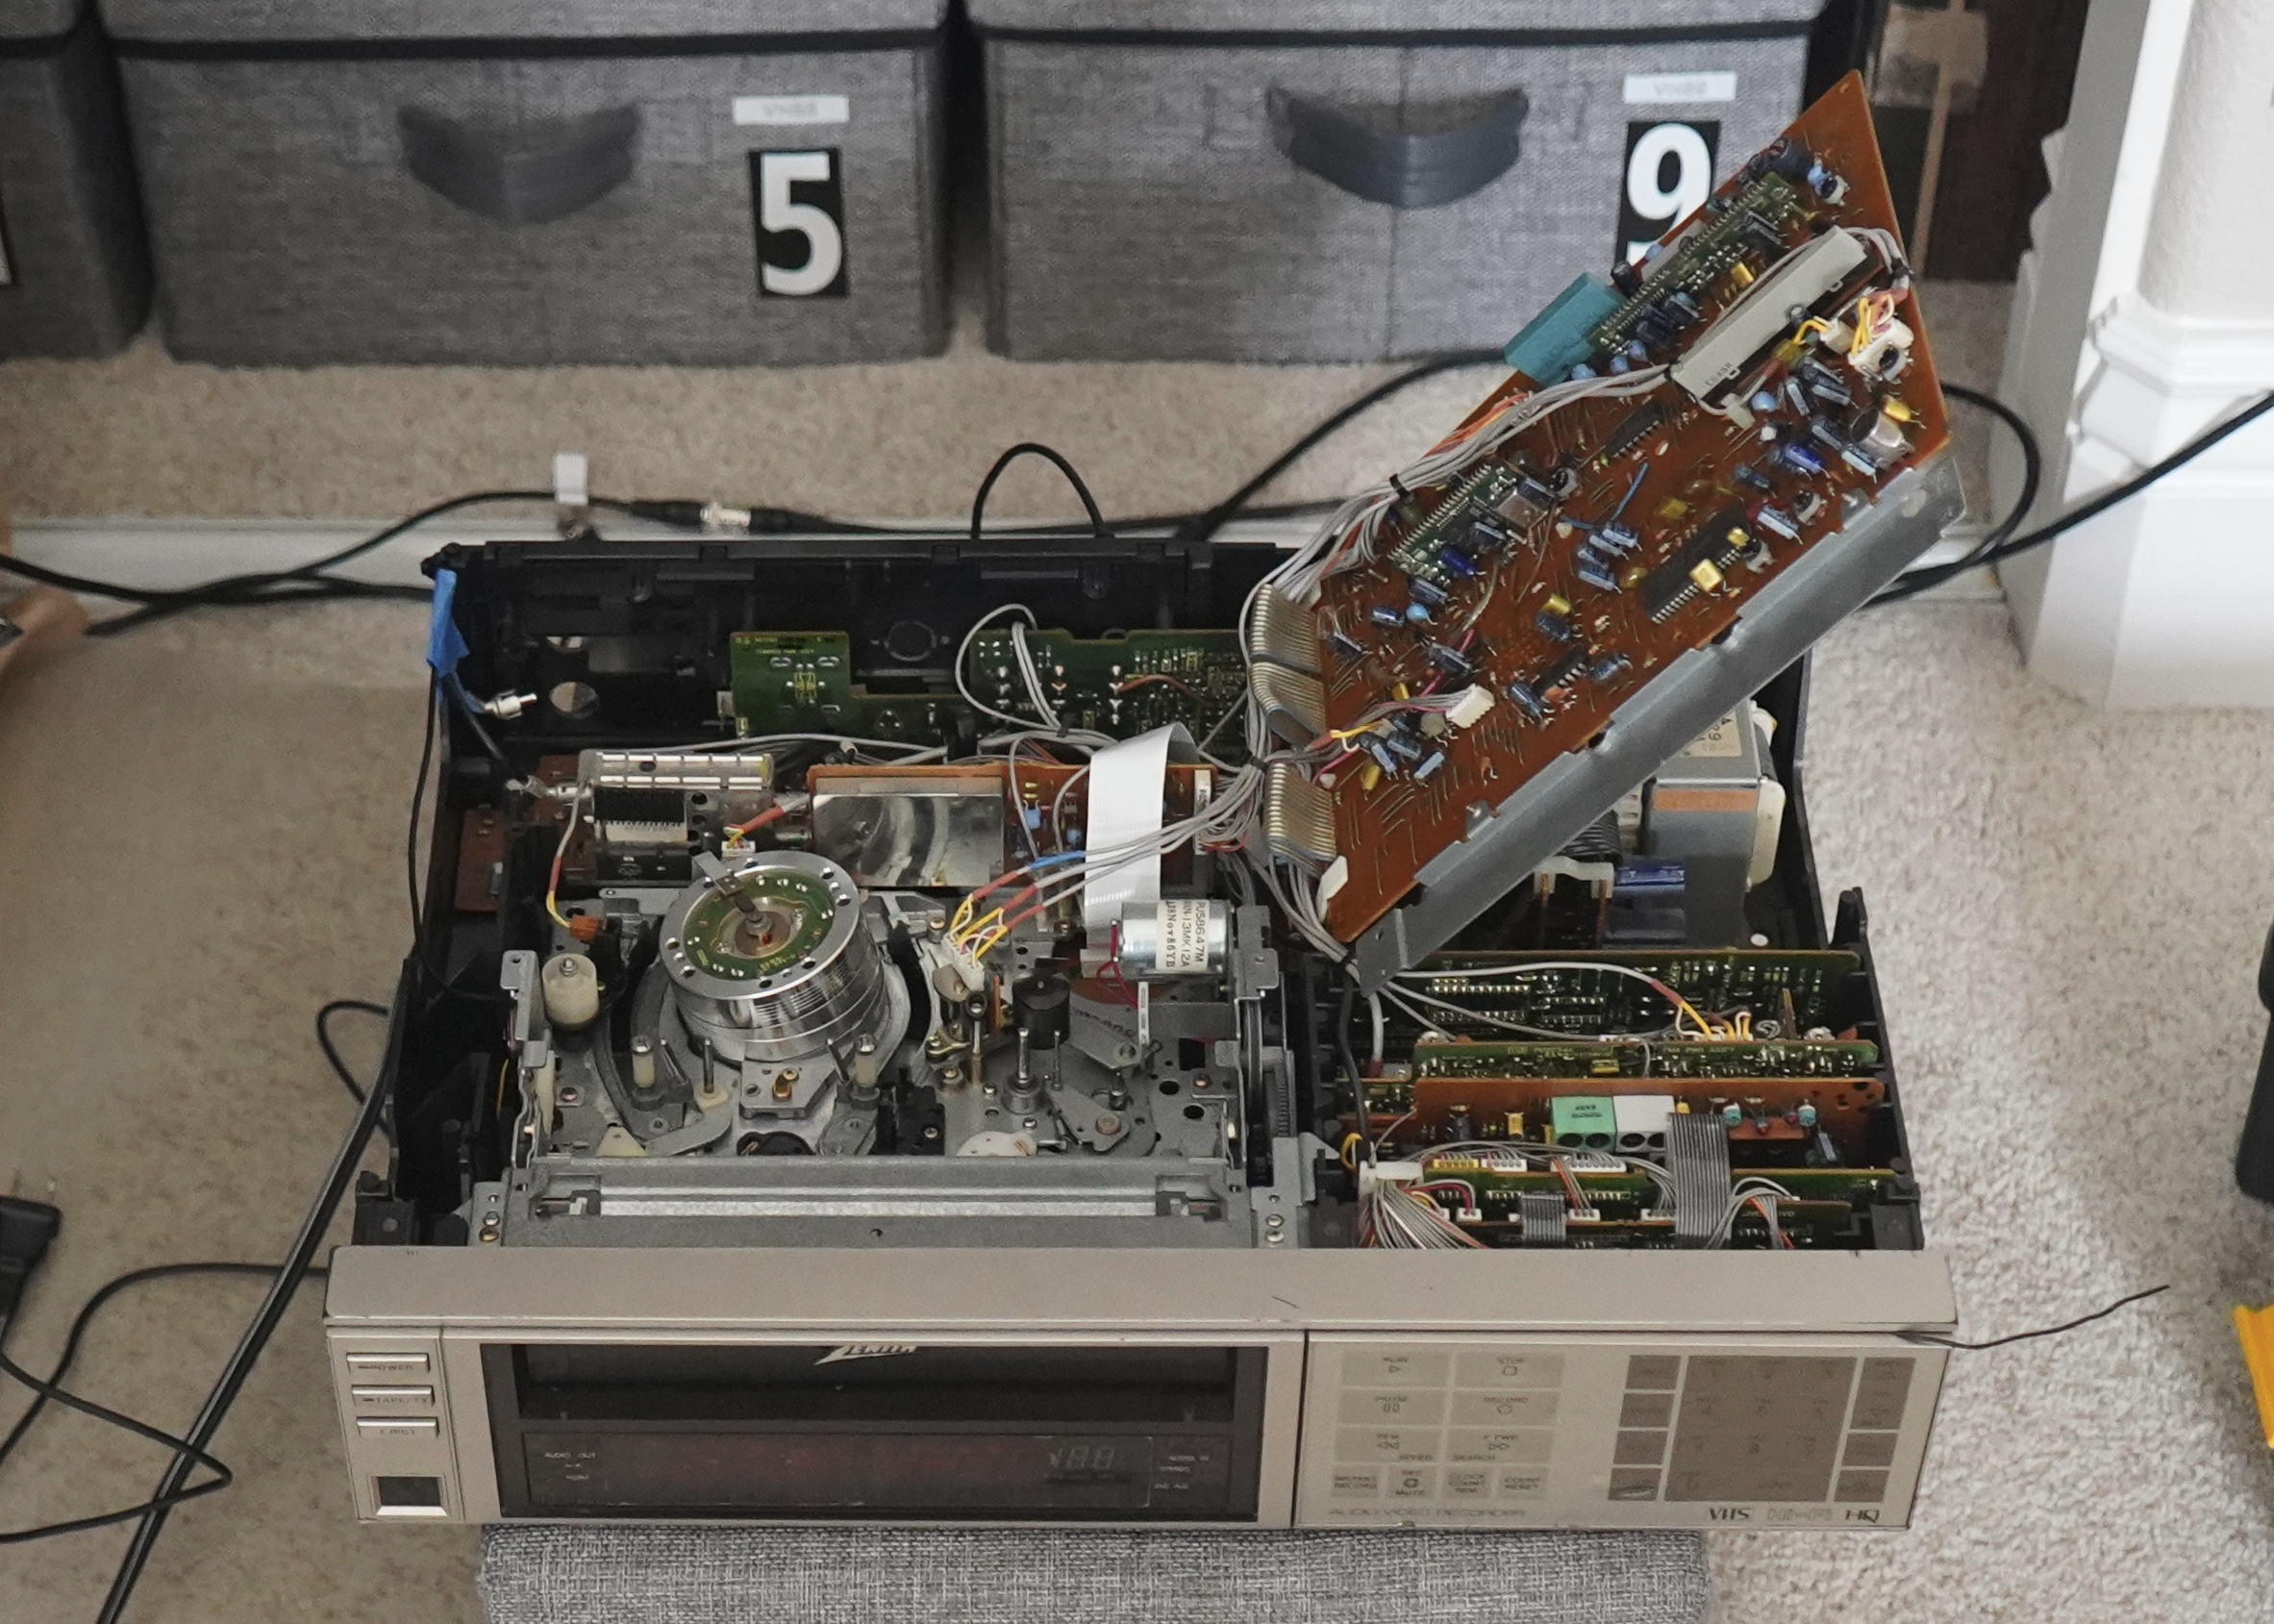
I use my Zenith VCR as the sacrificial VCR - for playing back suspect tapes. It’s already in quite a poor condition and would take a hefty amount of work to restore it to good condition (and spare parts which I haven’t tracked down yet), so I use it to check new arrival tapes (also as a rewinder).

The tape itself looked quite well - minor to no crumpling, no visible discoloration of the surface, no visible residue. No mold anywhere on the tape itself.

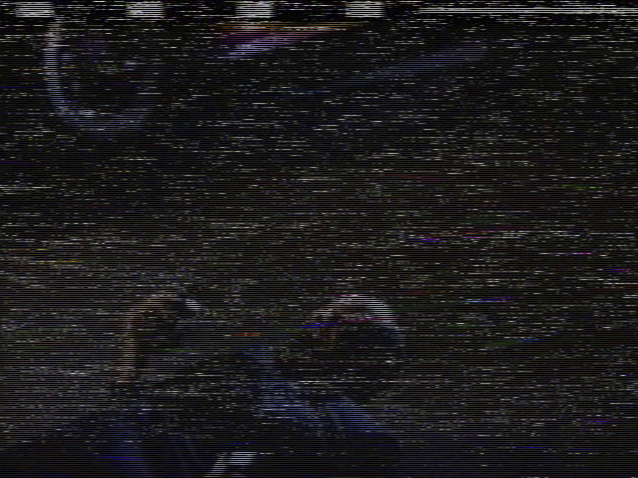
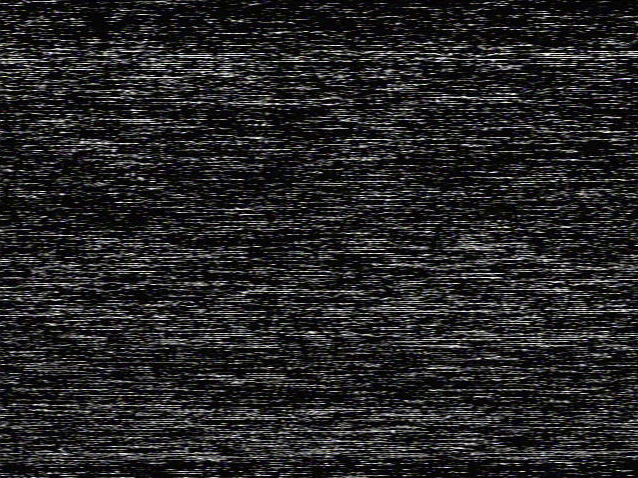
However when I tried to play it, I was greeted with the image visible above. Maybe the tape did not have any data on it? But no - I put in a known good tape after this and it showed the exact same image.

The video heads got completely clogged! So there was some sort of an invisible residue left on the tape that gunked them up completely. I pulled the VCR out of the rack and opened it up, did a full video drum cleaning as well as the rest of the tape transport.

Well, it was good news after this - the known good tape returned to good playback quality. This confirmed that the cause was specifically contamination of the video heads on the video drum - something was deposited on the tape that I could not detect by smell or visually.

All tape arrivals always pass sniff check - this is hard to describe in text, but I’ve gotten used to a certain spectrum of smells that I consider acceptable. Sticky shed syndrome, invisible tape mold and other factors show up in the sniff test.

In fact, this tape smelled like it was stored particularly well - oddly enough. This means that in this case the sniff check failed, turns out there are some types of residue that cannot be picked up visually or by smell (I was worried it may be the case - this shows that it can easily be so).

But then I tried playing the contaminated tape again. This time the heads clogged up again, however they started clearing up pretty quickly right after. I did one more test after this and the contamination is largely gone - very little of it still remains and it no longer clogs the video heads. So in other words:

  1. First playthrough: total contamination to point of no image whatsoever
  2. Second playthrough: heavily snowed image, one head fully clogged, other partly clogged (see image below - it shows an interlaced output and while half of the lines show something like an image, the other half contain mostly noise).
  3. Third playthrough: bands of distortion and noise, some transient head clogging, but the heads clean themselves in a couple seconds. The rest of the tape plays clean

The fact that clogging would get reduced with each playthrough indicates it was soft deposit and not for example the sticky shed of the tape itself.

I think the tape has experienced a short time of being in mold-growth conditions (high humidity) during which the mold grew on human residue (oils etc) and all around inside the box. The patterns of residue match to Cladosporium (an extremely common household mold, spores of which are present everywhere) - which does not decisively prove that’s what it is, but it’s the most likely option.

The tape ended up in humid conditions, mold grew all around the box and on the tape shell, but then the tape was moved to better storage and all mold died out. I believe no mold ever ended up settling on the tape itself - only residue and outgassing vapors from nearby mold colonies depositing on the surface.

The residue and exposure was limited just to the externally accessible parts of the tape - the shell, the exposed part of the tape (which conveniently only had black signal on it, a safety margin built into VHS tapes by convention). The inner packing of the tape is so tight that no residue penetrated into it. And because the mold conditions seem to have been short-term, no mold started growing on the sides of the tape pack.

There is visible residue on the shell, I think in the few places where moisture ended up trapped for a prolonged time. I wonder what kind of improvements to my cleaning process I could add to better handle cases like this…

Other than the initial segment of the tape, the rest of it seems to be quite clean. Still, I don’t want to risk the video heads in my good VCR’s, so when it’ll be time to play this specific tape during the video I’m going to use Zenith again.

A lot of people are slightly confused on what’s the actual issue with mold on tapes. The issue isn’t usually a hazard to humans, nor it “infects” the VCR. The real danger is that the mold often has very abrasive particles which can significantly damage the video heads, as well as possible soft deposits in the general vicinity - as demonstrated above.

So if a moldy tape ends up inside the VCR, it’s not a fatal issue - just requires a thorough cleaning of the entire tape transport, video heads, A/C head, etc. Don’t want abrasive particles to stay there and scratch the heads & tapes played after.

In my particular case, there don’t seem to have been any abrasive particles deposited on the tape as such - just the invisible, scent-free residue. Soft and finite, most of it got taken up by the video heads and then cleaned off by me - still, the risk is why I have a sacrificial VCR in the first place.

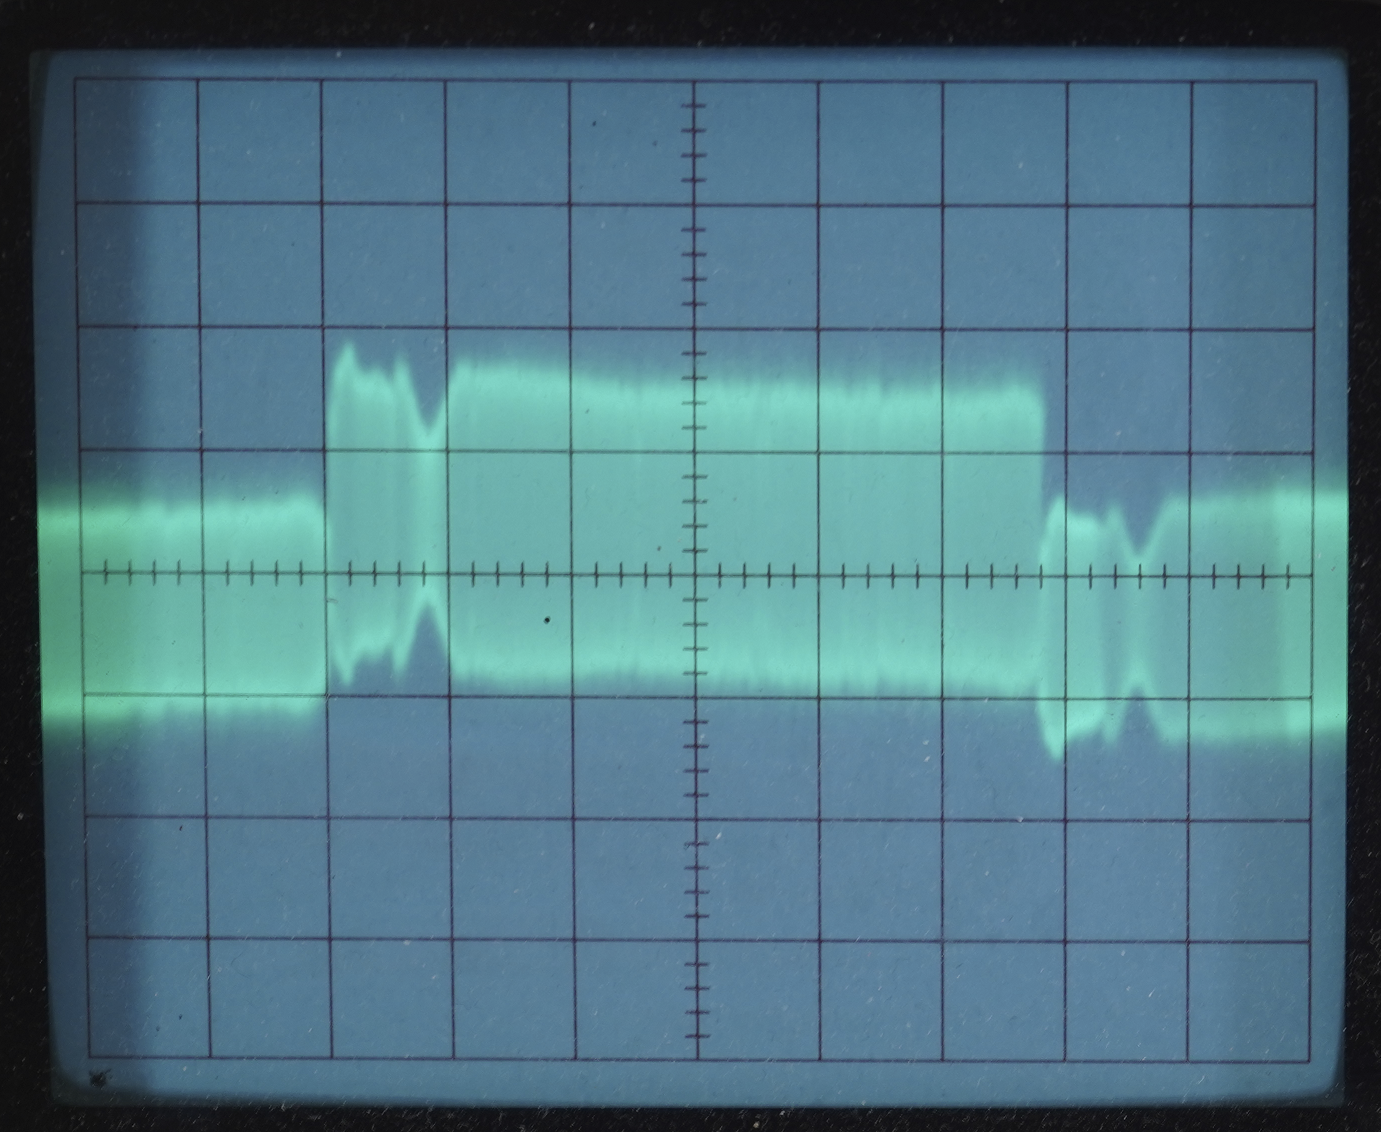
Also, just because I had the opportunity and because there was already a known alignment issue on this VCR, I have performed partial re-alignment. Specifically making the FM signal look much healthier than it was before - the VCR is still showing significant X-value error.

It is far from perfect, but it’s much more uniform - previously it was showing a clear hump. It also responds to tracking better (mostly uniform - albeit the middle drops faster than the outside ends). Further alignment is limited by the fact that I could not find all the required test points inside this VCR.

VHS Playback Physics Simulator

I want to study my centroid methodology more conveniently and later prove formally that what I came up with actually results in aligned VCRs. So I have been working on a physics model of the VHS playback - specifically the impact of mechanical aspects of playback on the RF envelope read by video heads.

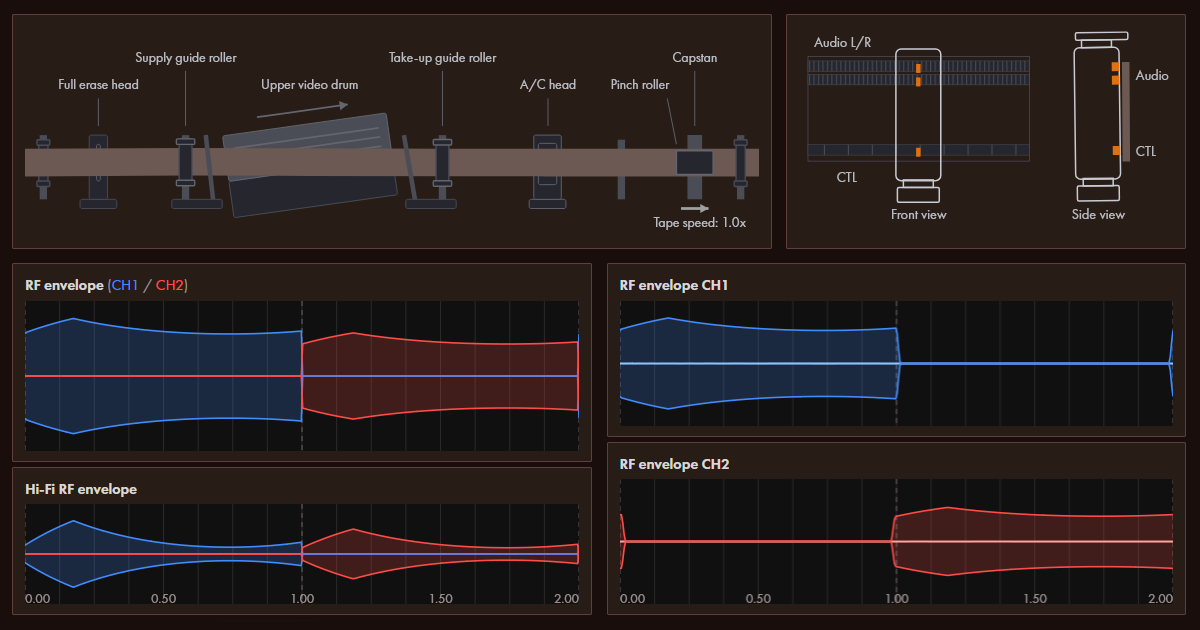
» The VHS playback simulator can be accessed here «

I’m not that good at HTML, so it’s just kludged together for the most part… but I think I fixed the most embarrassing HTML-related bugs by now.

This is effectively a purely geometric model with just basic physics - a very simple, idealistic reflection of what happens inside the VHS playback. The simulator calculates the following things:

  • How geometry of tape wraps around the drum
  • How the video heads pass over video tracks on the tape during rotation
  • The basic operation of the servo circuit and how CTL pulses are used
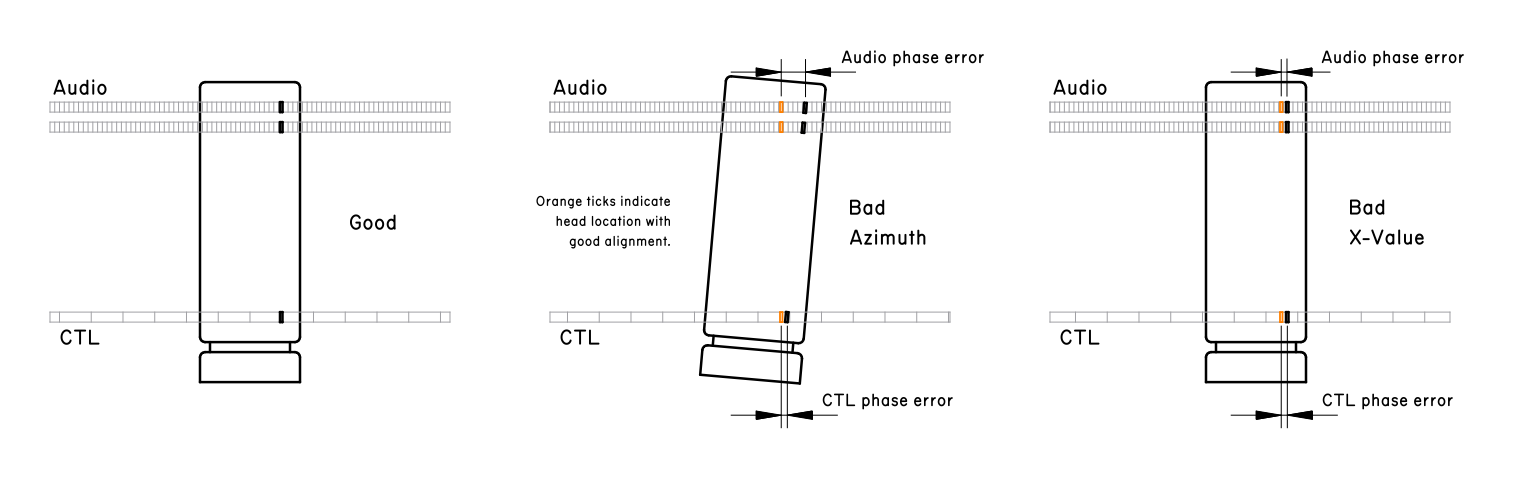
  • Simple model of the audio/control head that reflects how X-value, azimuth and tilt all impact the output signals
  • Simple model of linear and Hi-Fi audio which shows phase relationship between the two depending on the adjustments of the A/C head
  • Basic physics of azimuth rejection that ensure the signal from nearby tracks does not interfere with the track being currently read
  • Both EP and SP mode are supported, showing how much more sensitive the EP mode is to alignment (see this post 0014 for more information)

VHS Simulator Quick Reference

The VHS simulator will output the following indications, naming from top to bottom:

  1. Graphic indication of the tape transport path. A schematic indication illustrating the alignment of the tape to the video drum, position of the A/C head. All distances exaggerated
  2. Graphic indication of the A/C head alignment - azimuth, X-value offset, tilt
  3. RF envelope - predicted RF envelope as seen after the head amplifier of the VCR
  4. Hi-Fi RF envelope - predicted Hi-Fi RF envelope that accounts for narrower width of the Hi-Fi track
  5. Head switch pulse - shows signal that selects which head is connected to the amplifier. See also “head switch offset” parameter
  6. CTL pulses - simulation of the CTL pulses as read by the A/C head
  7. Relative audio phases - 10x zoomed in view of the Hi-Fi, linear audio left and linear audio right waveforms. This indicates the relative phase between all of these signals, which will vary with X-value adjustments and A/C head azimuth
  8. RF envelope CH1 - output of the CH1 video head, including the dead zone when it is not touching the tape
  9. RF envelope CH2 - same for CH2 video head
  10. Linear audio R - right channel of the linear audio track (shown at the same scale as the RF envelope)
  11. Linear audio L - left channel of the linear audio track
  12. Hi-Fi audio - audio picked up from the Hi-Fi system. The audio will vanish if Hi-Fi is predicted to not have been reliably established

Underneath there is a list of parameters for the model that can be edited and the tracking meter (I couldn’t really fit it anywhere else). The tracking level meter is made to work the same way as it does on my BR-S800U - it shows the integrated RF envelope.

This is a short reference for all the model parameters, see below for a more detailed explanation of the physics involved:

ParameterDescription
Playback modeSelects between SP or EP playback mode (EP tape runs at 1/3rd of the rate the SP does, the tracks are much more narrow and the EP video heads are accordingly adjusted)
Tape speedCurrent tape playback/shuttle speed. 1.0x means normal playback, 0.0x is still mode, -1.0x is reverse playback mode
Tracking knobTracking adjustment knob - allows adjusting tracking same way it works on my BR-S800U (offset by one SP track width - in EP mode it crosses over multiple tracks)
Supply offsetVertical offset of the supply side tape guide pole. Adjusts how the tape enters the video drum
Take-up offsetVertical offset of the take-up side tape guide pole. Adjusts how the tape leaves the video drum
X-value adjustmentOffset along the direction of tape flow of the A/C head position that defines phase relationship between CTL pulses and video track positions
Head switch offsetAllows adjusting where the VCR performs a head switch. It’s mostly just illustrative of the mechanic, it is usually supposed to be set to 0%
A/C head tiltSee A/C head graphic for visual illustration of the tilt angle. Affects how well the tape comes in contact with CTL head and linear audio R/L heads. Very simplistic modelling just for illustrative purposes
A/C head azimuthAzimuth of the A/C head. See graphic. Affects the phase relationship between CTL, linear audio R/L tracks.
A/C head heightVertical height adjustment of the A/C head that models the vertical misalignment between the A/C individual heads and the tracks on the tape
CH1/CH2 azimuth errorAzimuth deflection of the video head (see “azimuth scanning loss” chapter for more details)
CH1/CH2 gainAdditional gain in decibels for the specified head (no specific physics meaning - just allows adjusting amplification for both heads individually)
CH1/CH2 heightHeight/altitude offset of the video head. This is vertical offset along the drum rotation axis - maps to lateral offset between the head and the video track
CH1/CH2 protrusionDistance by which the video head sticks outside of the normal diameter of the video drum. This causes the heads to come in contact with tape earlier and leave contact later, additionally skewing the time base of the actual FM segment that ends up in the head switching window for that head. Negative values correspond to severe head wear, indicating that head has “receded” closer into the drum
Recorded signal typeWhich audio signal is recorded on the tape (stereo L/R tracks plus Hi-Fi). Allows to select sine wave or the pulse coded sine wave for absolute phase determination. The pulse coded (AM-modulated) sine wave will illustrate the phase offset in absolute terms where normal sine wave cannot.
Recorded signal frequencyBase frequency for the recorded signal. This affects azimuth scanning losses for the audio heads due to A/C head azimuth, the visual display of the signal and have some effect on the amplitude of the audio signal due to linear audio response curve (in current simulator the response curve is assumed for SP recording)

Model Description - Time Around Drum

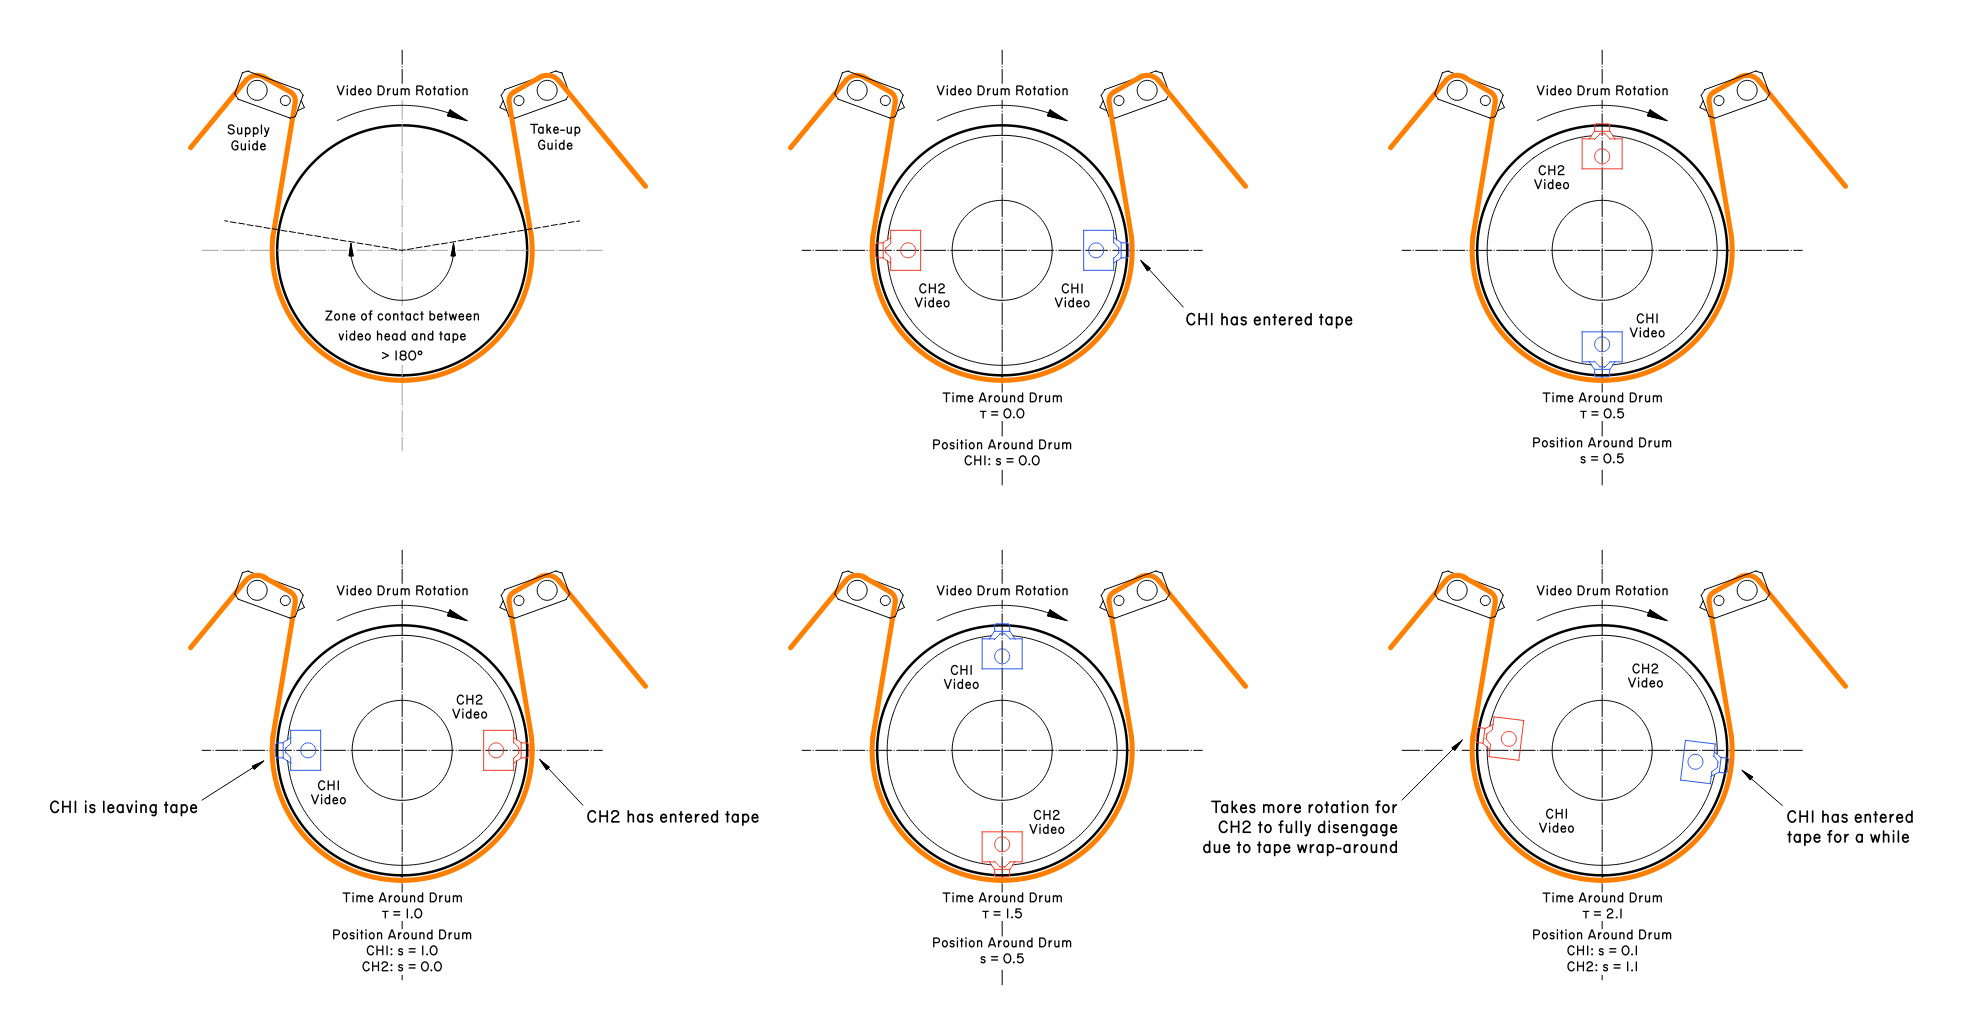
The main input variable of the entire model is time around the drum (TimeAroundDrum a.k.a. tau). It is a unitless measure of both time and space dependencies in the movement of the video drum:

  1. CH1 video head begins to touch tape at 0.0 tau - the supply-side contact point
  2. The video drum performs first half-rotation, scanning the first field
  3. The CH1 head leaves tape at 1.0 tau, CH2 head begins to contact tape at the same time. CH1 leaves at take-up side, the CH2 enters at supply side
  4. The CH2 head scans across the tape as drum performs second half-rotation, scanning the second field
  5. CH2 head leaves the tape at 2.0 tau

The explanation above is somewhat simplified - actually CH1 head begins to contact tape slightly earlier than 0.0 tau and stops contacting tape slightly later after 1.0 tau (because tape is wrapped by more than 180 degrees around the drum!). This slight overlap allows to establish a truly seamless switching between the two channels and create a continuous FM signal.

The range of 0.0 to 2.0 tau represents the full single rotation of the video drum. Because the system is mechanically coupled, during normal operation of the drum “time” and “angular position of the drum” mean the same thing.

The position around the drum (PositionAroundDrum) is almost the same value as TimeAroundDrum, but brought to a normalized range of -0.5..1.5 to represent exact geometric position of video head around the span of rotation and around the VHS tape itself.

Time around the drum is used as “time” input to the model (for drawing RF envelope and audio signals over time), with “position” being calculated from it for each of the video heads.

Model Description - Video Head Scan Model

To calculate the RF envelope a very simple geometric model is used. Based on a variety of the parameters, the lateral offset between the video reading head and the video track is determined.

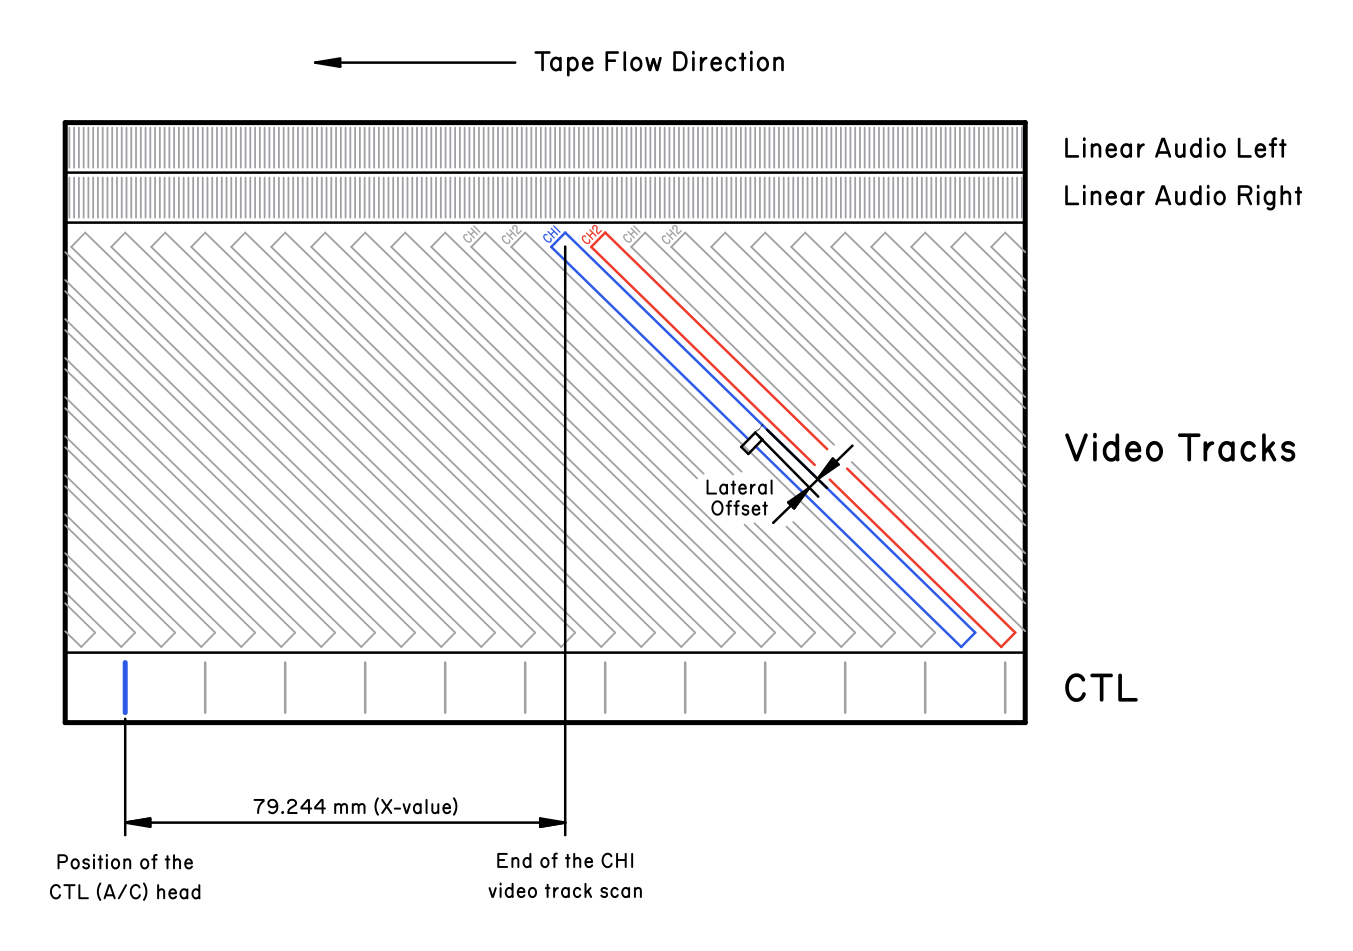
The lateral offset is measured perpendicular to the video track, effectively it is the deviation between the video head and the nominal video track (the video track that the video head would read in properly aligned conditions).

The lateral offset is used to determine how much of the video head actually overlaps with the video track. The signal attenuation due to misalignment is taken proportional to the amount of overlap between the video head and the video track.

The lateral offset is a sum of the following factors:

OffsetFormulaDescription
Supply Guide Lateral OffsetGuideSupplyOffset * exp(-s/const)Lateral offset due to supply guide adjustment, with mechanical relaxation across the drum span.
Take-up Guide Lateral OffsetGuideTakeupOffset * exp(-(1-s)/const)Lateral offset due to take-up guide adjustment, with mechanical relaxation across the drum span.
Bow OffsetBow * s * (1 - s)Parabolic bow due to stretching/elastic response of the VHS tape as it is wrapped around the drum. Strongest at equidistance between two tape guides.
Tracking Phase OffsetTrackingAdjustment * SP_TrackPitchTracking adjustment offsets the relative phase between CTL pulses and video tracks, resulting in a simple lateral offset.
Tape Flow Drift(Speed - 1.0) * TrackPitch * TauWhen tape is played back at 1.0x rate, the movement of the tape is aligned with movement of the video head, resulting in no lateral drift. But at any other speeds drift appears.
CTL Phase OffsetThetaSin * CTL_LateralOffsetA/C head azimuth and X-value adjustment both shift the CTL head along the tape length. This offset accounts for that, converting the lateral offset along the tape into lateral offset perpendicular to the video track.
Altitude OffsetHeadAltitudeHead altitude is the height adjustment of the video drum head. Because the rotation of video heads is aligned with video tracks, any height offset of the video heads becomes simple lateral offset between head and the video track.

There is an additional factor that modifies the effective position of the head around the drum, but it’s implemented at the level of the RF envelope model (see below). Protrusion of the video heads (due to wear or mechanical misadjustment) will cause the heads to come in contact with the tape earlier or later than intended.

Model Description - Azimuth Scanning Loss

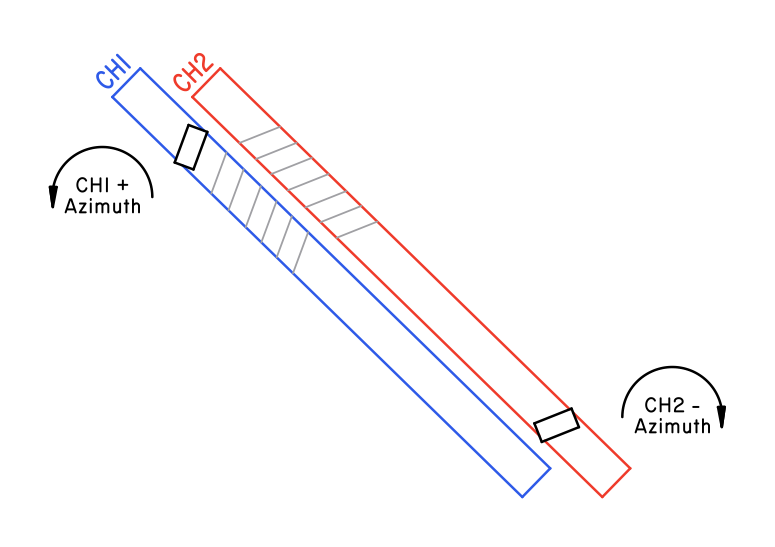
The two video heads in the VHS system are slightly rotated relative to each other in a way that I can only best illustrate using the picture below. The two heads have a +6° and a -6° azimuth - and the video tracks are actually laid down “skewed” accordingly.

This mechanism implements azimuth rejection: CH1 head will “see” a considerably reduced signal intensity of CH2 tracks, while CH2 will not “see” the CH1 video tracks.

When azimuth is correctly adjusted, the signals read by CH1 and CH2 head are both strongest (nominal) when they read their corresponding CH1/CH2 video tracks. When azimuth is misadjusted, there is an additional attenuation - azimuth scanning loss.

Linear audio tracks also experience azimuth loss due to azimuth mis-adjustment of the A/C head. This is the exact same physics of the process as with the video heads, despite the major difference between the kind of signals they read!

Note: this is my best attempt at making an azimuth loss model, but it may still be lacking. I did not really have means to verify this model against real world data - so consider it to represent “idealistic” behavior rather than numerically real.

The azimuth scanning loss depends on the size of the head gap and the wavelength of the signal. To approximately estimate it, first the “smear offset” is calculated - an approximate distance between leading and trailing ends of the head gap as projected onto the signal: $$SmearOffset = TrackWidth \cdot sin(HeadAzimuthAngle)$$ When head has non-zero azimuth relative to the track, this results in leading and trailing ends of the head gap to shift from being aligned with the signal waveform (assumed to be a sine wave in this case) to being read across the smear offset worth of the signal waveform.

From this, azimuth loss can be estimated by the sinc function, the integral of the magnetic flux over across the head gap (which is defined by smear offset along the direction of signal) for a sine wave signal: $$X = \frac{\pi \cdot SmearOffset}{Wavelength}$$ $$AzimuthLoss = sinc(X) = \frac{sin(X)}{X}$$

This azimuth loss model is defined for a sine wave signal. For the linear audio track, this is simply the base wavelength of the sine wave. For video signal, the situation diverges: azimuth rejection on luma signal is steeply different from chroma signal.

The wavelength can be determined as such: $$Wavelength = WaveVelocity / Frequency$$

The nominal linear velocity of the video head over the VHS tape is 5.80 meters per second. The frequency is fixed for the sine signal and variable for the video signal.

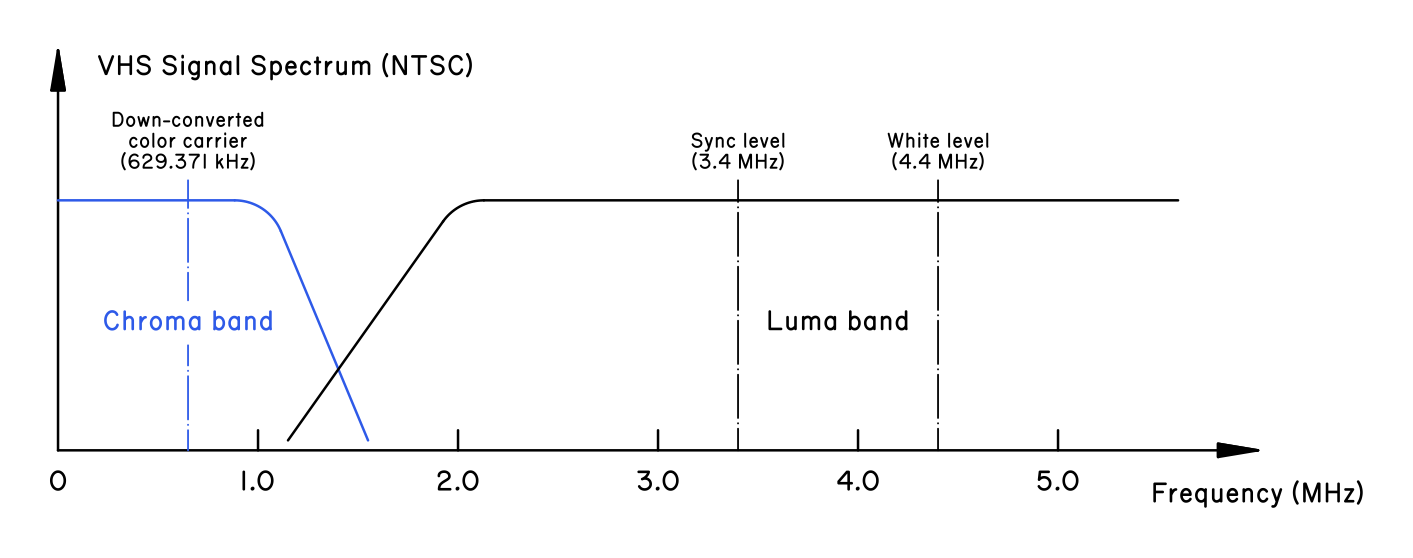
For luminance signal, the frequency is between 3.4 MHz and 4.4 MHz. For the chroma signal, due to down-conversion that is used with VHS, the frequency is centered around 0.629 MHz. There is also a considerable amount of energy in the side-lobes of the FM modulated carriers.

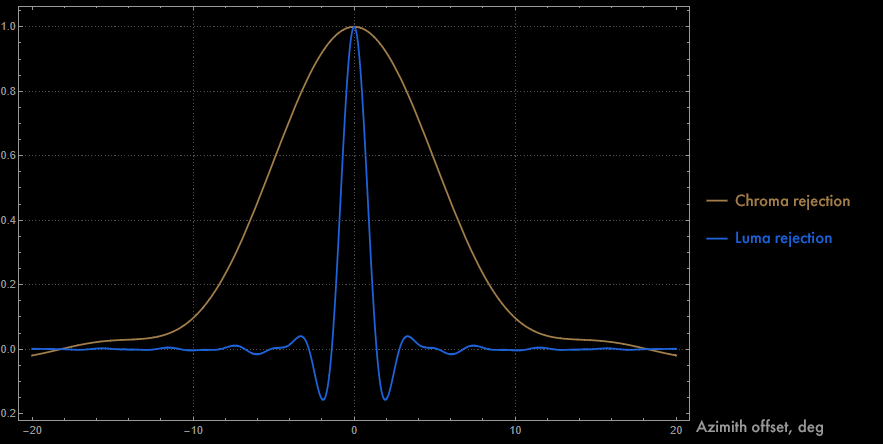
The wavelength is 9.2 um for chroma signal and ~1.5 um for luma signal (taking ~3.9 MHz as the reference frequency), which means a considerable difference in rejection between these two kinds of signal - chroma has very weak rejection while luminance signal has great rejection.

The graph below is obtained by integrating across many frequencies. The simulator shows the RF envelope using the luma recording wavelength - currently the actual simulator uses a simplified exponential fit to the center luma peak: $$AzimuthLoss \approx Exp(-0.75 \cdot HeadAzimuthAngle_{deg})] $$ This specific model represents the center of the luma rejection curve very well, but does not represent the sinc oscillating behavior at higher azimuth angles. So it’s valid in about 1.5° range.

Model Description - Full RF Envelope

The actual plots and model outputs are calculated using the RF envelope model. There are two components to it: RFMagnitudeForHeadPosition and RFEnvelopeFull.

RFMagnitudeForHeadPosition function returns magnitude of RF signal for the specific video head located at a specific lateral offset. It calculates overlap between the video head and the video track, calculates azimuth scanning loss and then applies head-specific gain value.

The function performs summing over all video tracks and returns separately the waveform of the nominal track and the waveform of all tracks except the nominal.

RFEnvelopeFull currently implements a basic VCR model. Two video heads (SP or EP) are calculated. Two Hi-Fi heads are also calculated for the Hi-Fi track. The function calculates the RF signal magnitude across the entire range for which model is evaluated.

At this point, additional adjustments are applied. Drum position offset from the protrusion height is calculated and offset is applied to the effective contact position between the video head and the tape.

Heads which are protruding outward from the drum result in an earlier contact with the tape, while the heads which are sunken into the drum result in a later contact. The current simulator does not reflect signal magnitude loss due to increased distance between the tape and the head.

Next, tape wrap envelope is calculated based on 180° + some extra wrap-around. This envelope is applied to the calculated RF values, correctly applying the geometric limitations of the video head contact with the tape, as well as progressive loss of signal at the contact points.

RFEnvelopeFull returns signal magnitude referenced to the ideal value, with the protrusion offset, lateral offset, RFMagnitudeForHeadPosition and the tape wrap envelope all properly applied.

Model Description - A/C Head

The model of the audio/control head allows to play around with misadjusted X-value, tilt, azimuth. Both linear audio and CTL pulses are simulated.

CTL pulses are rather simplistic, just basic pulses corresponding to magnetic flux at the edges of the square wave control pulse. The CTL pulses depend on speed and A/C head alignment, but they are intended to be primarily illustrative.

The linear audio signals involve generating the representation of the entire audio signal. Azimuth, X-value and tracking knob position all affect linear audio phase relative to video signal/Hi-Fi audio phase (both are connected - they are written by the same video drum, while linear audio is read by the A/C head).

The A/C head model is mostly geometric:

  • Azimuth loss is calculated based on geometric offset of heads from the correct track, based on the wavelength of the recorded waveform
  • CTL head, linear audio R and linear audio L heads are separately calculated
  • For each head, its geometric position due to tilt and azimuth of the A/C head is calculated
  • A simplistic tilt attenuation model is applied to the signal (it is only illustrative - it tries to recreate what happens on the graphic when tilt parameter is adjusted)
  • Phase offset is calculated. Due to geometric offset, all of the heads may read pulses/audio earlier or later. This has an effect on the behavior of the servo mechanism - azimuth adjustments to A/C head are equivalent to X-value adjustments
  • For linear audio, response curve for the linear audio track (SP only for now) is applied

Model Description - Hi-Fi Locking

This one is the simplest model of them all. If RF envelope of the Hi-Fi signal has dropouts below a certain threshold anywhere in the signal, the signal is considered to not lock.

This is based on the behavior of Hi-Fi lock on my BR-S800U: the lock is obtained if the signal was above threshold for a given time interval and is lost if there is any considerable drop-out happening.

Because the VHS simulator does not represent behavior of the system over longer timespan, it’s assumed that if the first two revolutions of the drum contain weak Hi-Fi signal, the lock is just unstable.

Anomaly in CEA-608 Subtitles

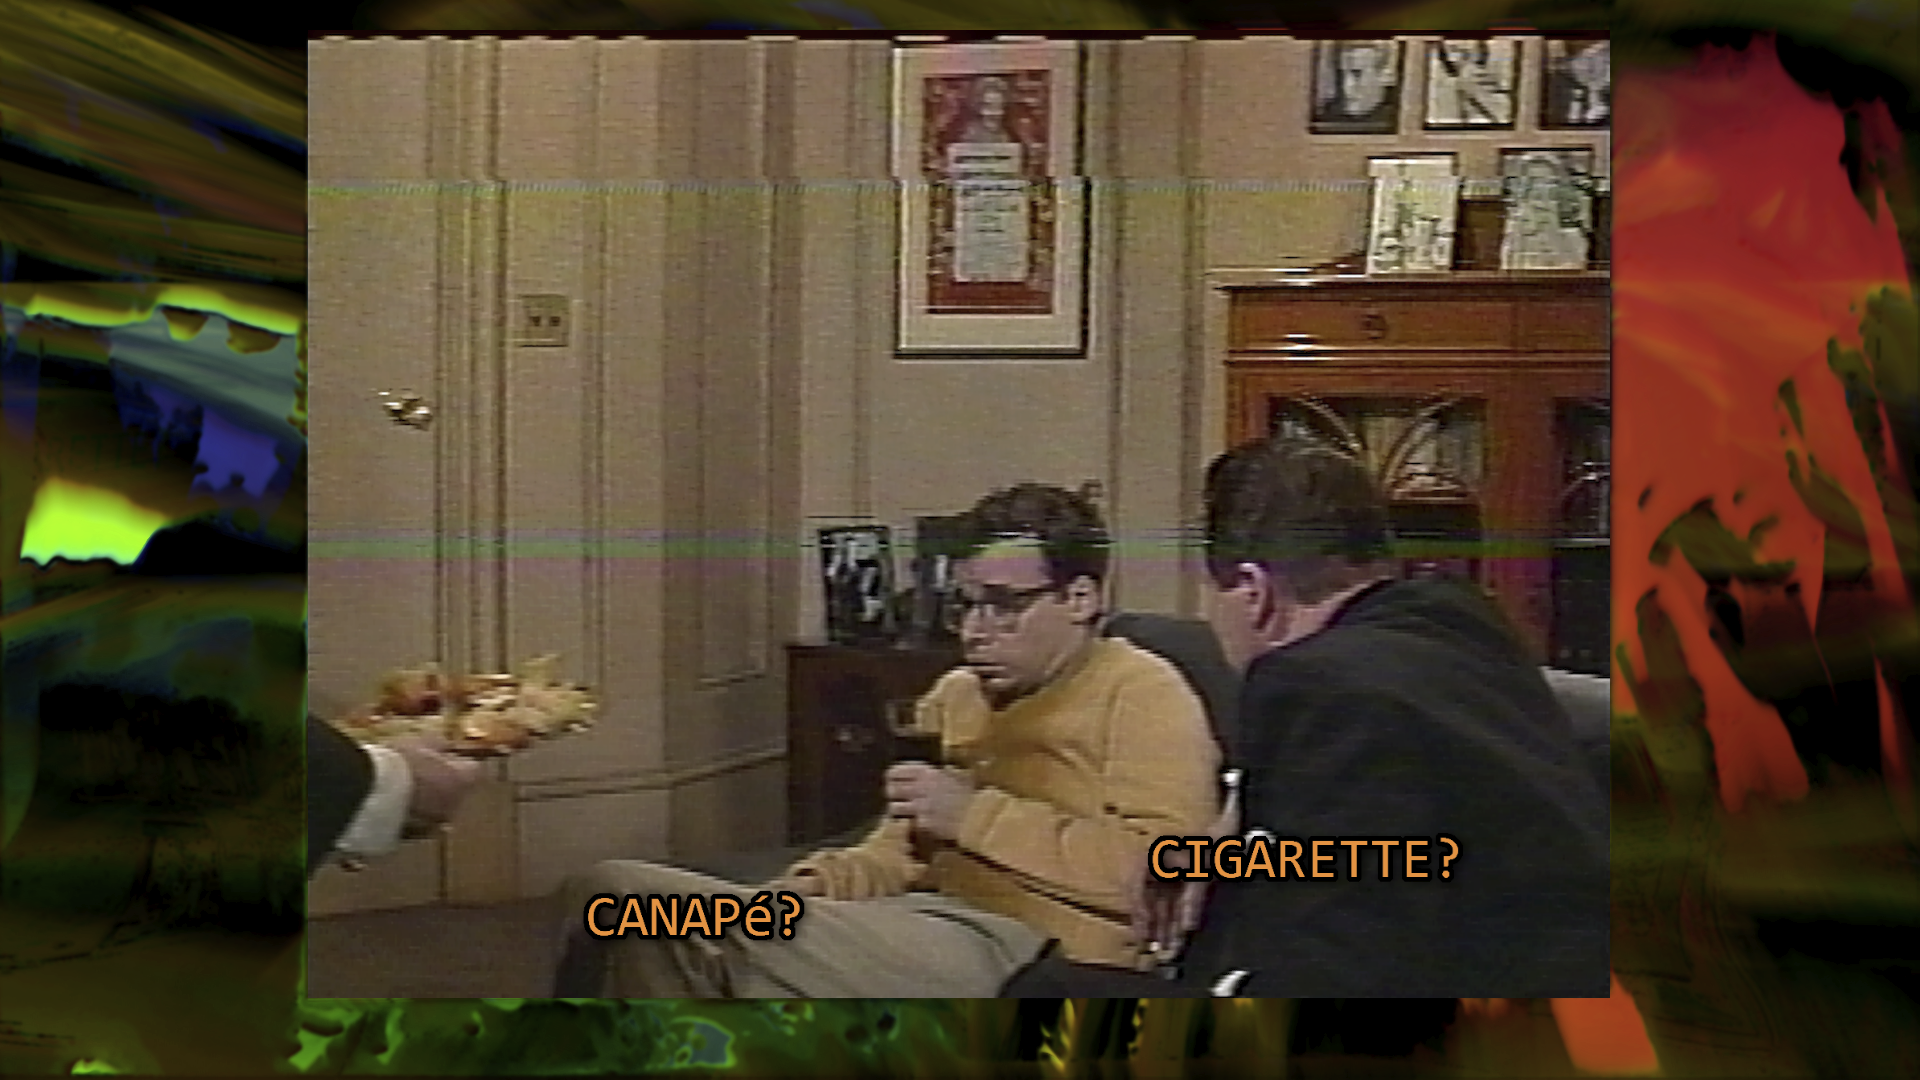
I found a CEA-608 encoding anomaly on the Little Shop of Horrors VHS (catalog no. 11702). At some point during the showing there is a subtitle encoded as “CANAPé” instead of “CANAPÉ” as following the style would call for.

The usual style for captions is all-uppercase letters for dialog, normal case letters for whispering. A later extension (CEA-608-B) added extended italic tags… but I’ve never seen them used in a movie just yet.

Why does this anomaly exist: the base CEA-608 character set only includes a lowercase “é” encoded as part of the basic set (single byte 0x5C). Uppercase “É” was only added later and is part of the extended character set 1.

So either this was encoded before the CEA-608-B extension or more likely it was just encoded on legacy hardware/through a legacy working process. The uppercase “É” would be encoded by three bytes: 0x45 0x12 0x21, which will print basic character set “E” followed by a control code which - if supported - will step one character back and overwrite “E” with “É”.

The CEA-608 standard says “transmit the standard character that most closely resembles the extended character, for receivers that can’t decode it”… so there is a way to encode this in a better way - if the closed captions encoding system used would allow to enter such a sequence.

This would be the CEA-608 sequence for the subtitle in question: 0x4341 0x4E41 0x505C 0x1221 (grouped by two bytes). What it encodes: “CANAPé” followed by “extended set 1 character É” command which implicitly performs a backspace.

This would output “CANAPÉ” on later decoders and revert to “CANAPé” on earlier decoders without a violation of the spec in spirit (usually E is considered the fallback character for all E-accented character glyphs).

Philosophy of VCR Alignment

Attention: this is not yet working methodology, just my drafts of what I am considering of including in the final document. While I am working on writing the centroid methodology document, I will be publishing draft sections of what I am working on.

The text is intended to be followed by technical illustrations and pictures - these will be in the final document, but are not going to be included in the drafts.


What is good alignment?

In my personal opinion based on operating a video club where we routinely watch magnetic media, a tape system can be considered well-aligned when it satisfies the following practical points:

  1. Good playback of audio and video - good sync, good image quality, no fuzzies, zero tracking setting usually is the sweet spot for most tapes
  2. Tape flows smoothly through the transport and doesn’t crease/get caught/get damaged by anything
  3. For recording systems only: recorded audio and video signals play on other machines with no tracking adjustments

Most VCRs will play video just fine and will not damage the tape in their default state. You generally do not need to perform alignment in the first place as normal wear the VCRs experience still does not take the machinery too far out of the normal alignment.

However if you are rebuilding the machine and swapping key components around, the re-alignment becomes mandatory to get the machine to play anything. Therefore it seems fair to say that alignment is not a thing you do to improve the quality of playback but instead a technical operation you execute when you need to re-calibrate the VCR for a known good reason.

So the golden rule is don’t touch it if it works. Good alignment is when the player will reproduce the tapes. I had to re-align my player because it would not reproduce any tapes at all (the image came out corrupted since parts from different VCRs differed in exact geometry and adjustments).

Another thing worth mentioning: there exists a nominal alignment for the VHS system to which all VCRs were calibrated during the era when they were still around. These days all equipment you find will generally have experienced a degree of wear or simply has aged.

This gives a rise to the philosophical question of what is better - making the VCR aligned to the nominal specifications of the VHS system or making the VCR aligned to effective good playback of the tapes in modern times?

What is correct alignment?

If today was not the present day, the correct way to align a VCR would be the procedures described in detail in the service manual. These procedures require use of VCR-specific jigs and special alignment tapes which will encode correct signal that embeds inside of it geometric relationships so important to the configuration of the tape transport.

This is the first kind of correctness: normative correctness. A normative-correct alignment is the one made according to the original factory references. Such an alignment embeds exactly the key geometric values of the VHS system and brings VCR to agreement with the specification as it was printed.

Normative correctness was the correctness when the VHS format was not obsolete: the most assured way to record media that will be universally playable by assorted VCR machines was to calibrate the recording machine to normative correctness.

Normative correctness is the ideal. But factory alignment tapes and jigs are essentially unobtanium at this point. If you are very limited on resources like me, this path is impossible/too expensive/requires a prohibitive amount of effort.

However there is a second kind of correctness: effective correctness. An effective-correct alignment is the one that actually succeeds in playing back a broad sampling of VHS tapes, both commercial and home video. Effectively correct alignment has such key geometric values that they are in good coordination with the VHS standard and they result in accurate playback by the contemporary as-is device.

Effective correctness is what this methodology is aiming to attain. Not normative correctness. A VCR aligned according to the methodology presented here will be good at playing back tapes and will satisfy the requirements of “aligned well”… but it will not be a factory aligned VCR.

But today is the present and it has been many years since the VHS format became obsolete. Here is my opinion: effective correctness at this point is equivalent to normative correctness, but they are not the same thing.

In modern times, you can push VCR slightly further if you aim for effective correctness over normative, since the very parts VCR is made from are no longer very normative.

Philosophy and engineering of the dynamic systems

A well engineered, practical dynamic system (any machine, piece of software, any abstract design) generally exploits dynamic stability in some fashion.

If there is something dynamically unstable the engineering design calls to stabilize it. And now if something is dynamically stable (inherently so or because of a control system) then it will have a specific relation to dynamic state - be at some local extrema in the state space.

All of engineering effectively has to do with local optimization. The result is that engineered systems generally work in states which are locally optimized.

Here is how this connects to physical reality of VHS:

  1. The video heads must trace exact paths over the video tracks on the VHS cassette. Here is the local extrema: the resulting RF signal is at its highest when video head is aligned with the track, anything less than good alignment results in reduction of RF signal
  2. The control (CTL) pulses must arrive at the exact time the video head begins/finishes the traversal of the video track. Here is the local extrema: any deviation in pulse timing will offset the video heads off the correct tracks, the only correct alignment is the one which maximizes playback RF
  3. Two video heads must traverse the tape symmetrically and identically. There is nothing different about them - both heads read signal identically and are functionally interchangeable. The system is symmetrical, completely. Here is the local extrema: any deviation of one head from another changes the RF signal reading. The resulting playback is at its optimal when both heads behave symmetrically. If there was any residual azimuth or offset between the video track and video head, we will immediately see asymmetry in that one specific video head
  4. Capstan must pull the tape at the exact rate corresponding to video tracks and CTL pulses. Here is the local extrema: if pull speed is less than required or if pull speed is higher than required, then there is a constant shifting offset between the video heads and video tracks. This results in loss of stable RF and instead we get long-duration pulses (whenever heads ‘slide off’ the video track and show us the space between video tracks)
  5. Hi-Fi signal should be largely close and almost in-phase with linear audio signal. Here is the local extrema: these signals are synchronized during the recording, so any time offset during playback suggests that the geometric distance between the video drum (Hi-Fi audio) and the A/C head (linear audio) is incorrect.

So here is the fundamental statement on which this methodology is based on: VHS system in its aligned state sits at the local extrema by some key measurable parameters.

Therefore we can perform a alignment of a VCR by iteratively pushing it towards the local extrema using the commercial video tapes as a reference.

So what do I do?

In order to effectively repair a VCR you must understand the physics behind how everything works. How the servo system works, how the video head reads data off the tape, etc…

Explaining this is beyond the scope of the current document. That is the knowledge that should be obtained in parallel with this if you really do attempt something like this.